Sunday, December 26, 2010

Latest project ..............

As most of you know, I follow a great artist, Laura Denison, from Follow the Paper Trail - this happens to be one of her original creations, and this is my interpretation of it.  It's a Steampunk Cuckoo Clock that houses a mini album, chock full of tons of real estate for journaling and photos.  I, hopefully, will be making two of these clocks for my sons, and the albums will contain the family ancestory from both sides of the family - up until the time that they themselves got married and started families of their own.  Since I also have a daughter, I thought she would be happier with a typical "fluff and stuff" mini, with tons of ribbons, buttons, ephemera, etc., but the boys would prefer something more manly for display purposes.  There is hanger on the back so it can be hung on the wall, just like a real cuckoo clock.

Below are the photos, as promised, and a short description as to the contents of the photos.


This is the almost full frontal view of the clock.


Here is the view of it in its entirety.


This is the top of the clock, with butterfly wings, attached to a vintage button, around the hole for the cuckoo bird.  A little below the base of the wings, you can see the bird.  There is a book corner attached to the peak of the clock for a finshed look and the front of the roof has been painted with crackle paint, then distressed with walnut ink.


This is a collection of peacock, pheasant and other bird feathers, under a gear and metal copper flower that I made.  Tiny, very downy feathers peak out from behind the metal flower which is sitting on a gear shape, which has been sprayed with copper glimmer mist.


This is a view through the square hole in the front of the clock which reveals the metal laden front cover of the album housed inside the clock.  It has metal keyholes, chains, keys, clock face, and other metal embellishments on its cover.


Toward the base of the clock, you'll see four clocks, complete with moving hands for adornment.


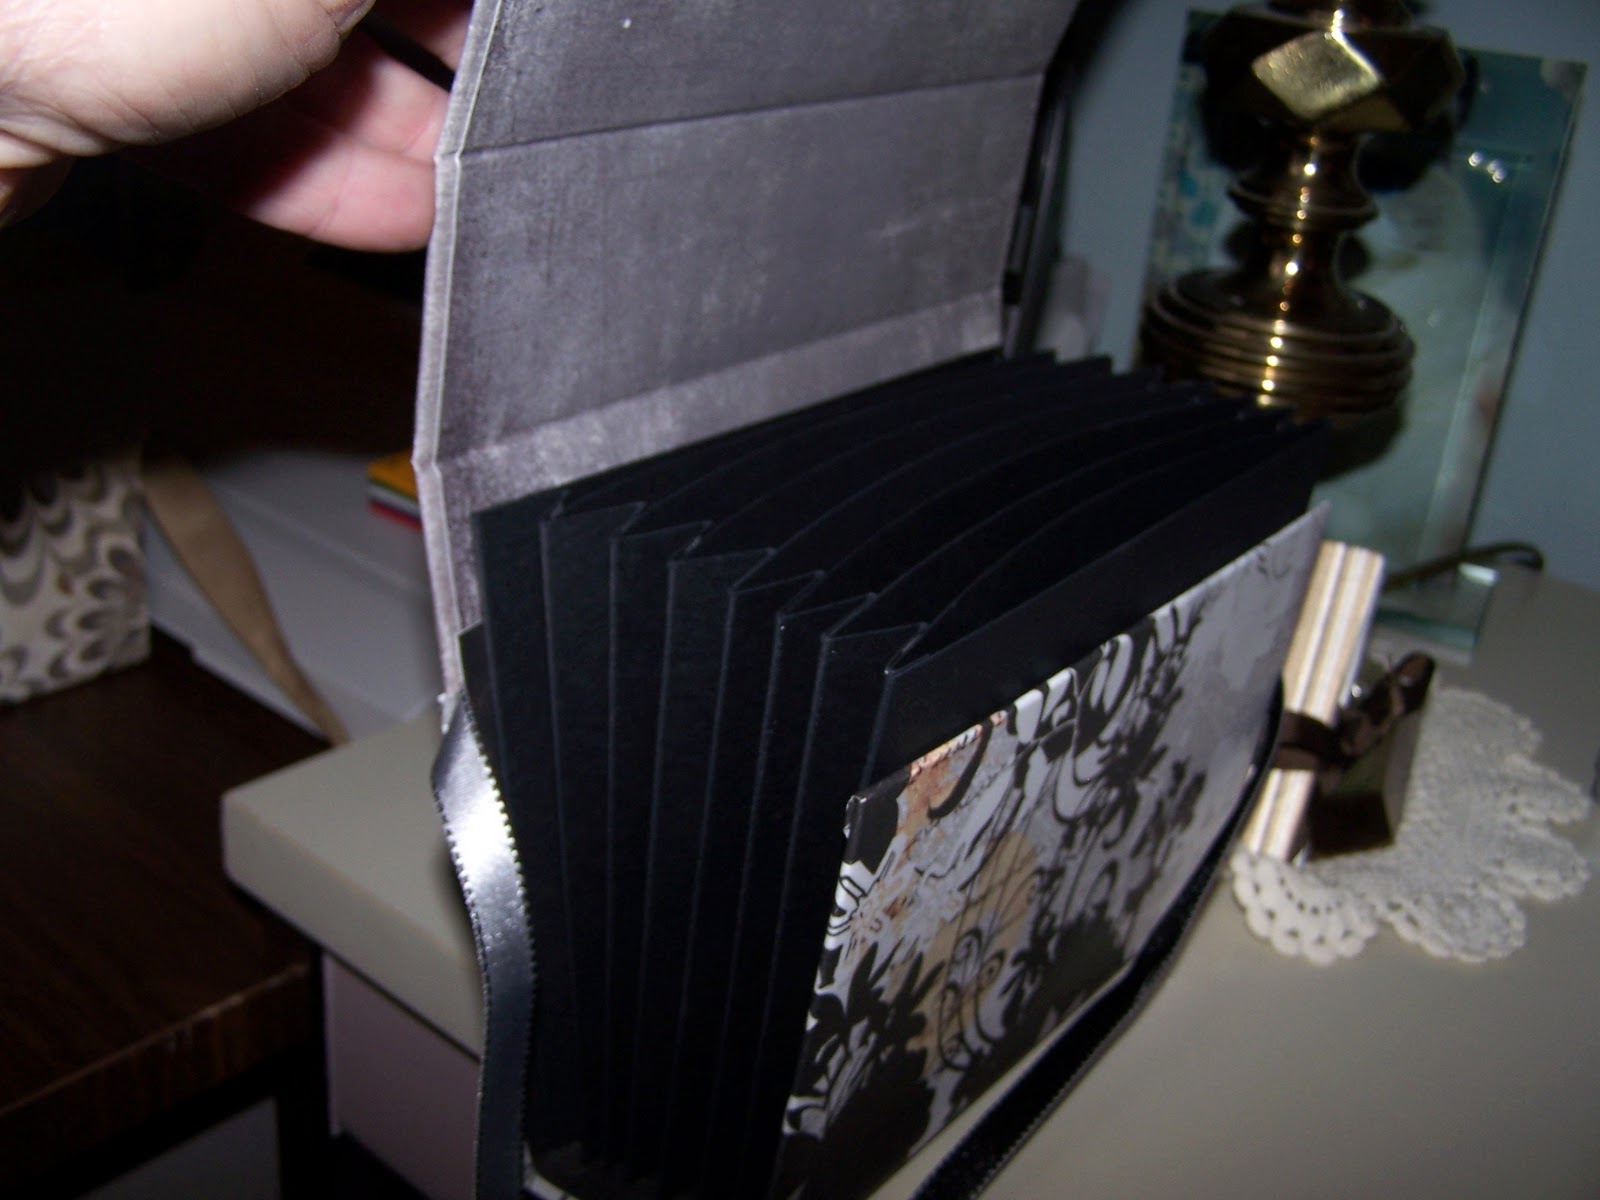
Here's a shot of the album that was "hiding" inside the clock, sitting next to the clock itself


The exposed cover of the album.  There are numerous tags inside the coin envelope tucked inside the mini that have ball chain attached to them - adding to the "heavy metal" ambiance of Steampunk.

All of the pages, coin envelopes, and both covers are attached by two 3" jump rings, again to stay with the metal theme.  Each of the holes that punched for binding the pages together, have eyelets attached to reinforce the pages/covers because of the metal rings.  They are various colors depending on the patterned papers that were covering each page.


Now, we start looking at the pages of the inside of the album itself.  This is inside the front cover. Tags are tucked into the pocket created by a tag that was adhered to the inside.


Yet another pocket with a tag.


Next page has a pocket with tag, and the flap that lifts up can also be home to a journaling block or photo, with or without a mat.  Same with the patterned paper on the right.  All of the following pages have a great deal of space for placing photos where ever and when ever you want them.  Every section has multiple tags used for the same purpose(s).


Flap that lifts up revealing more space for photos.


Two more spaces and a double sided tag in the pocket.


On the left, you'll see a coin envelope, that has been distressed, which holds 1-2 tags for photos/journaling.  There is patterned paper on each side of each coin envelope.  On this album, I cut the flap off and punched a finger pull for easy removal of the tags.  These are the tags that the ball chains are connected to.


Double page layout for photos/journaling and a pocket with double sided tag.


Left side, flap to hold photos/journaling, flips up to expose two more areas for photos/journaling, and a pocket with double sided tag, again for photos/journaling.  Right side is a coin envelope, both sides covered with patterned paper and contains two tags, one with ball chain attached.


A view of the pages described above, only now the flap on the left has been lifted.


Back side of previous coin envelope, and next page with slash pocket and space for tags.


Lifting the previous right flap reveals a pocket with 2 large spaces for photos/journaling and a double sided tag.


Next set of two pages - described below.


Lifting the previous left flap, reveals the pocket, double spaces for photos/journaling, and double sided tag.  The right side finds another coin envelope.


Back side of previous coin envelope and right side has a V-shaped pocket for tag holding.


Lifting up the previous V-shaped pocket page, reveals double spaces for photos/journaling and a double sided tag, also for photos/journaling.


Next two pages, described below.


Lift left flap, and the double areas contain space for photos/journaling and the large, double sided tag also can be used for photos/journaling.  The right side reveals another coin envelope.


Back side of coin, right side has tag mounted to create a pocket for more tags.


Flap up and double sided space for photos/journaling and double sided tag.


Left, the last section which reiterates what all the other pages were designed to hold.


More two page spreads.


More two page spreads.


Last page, with two large areas for photos/journaling, and double sided tag.  Inside of back cover.


Looking down onto the album.


Full front view of clock


Full front view of clock, with chains and weights.


Close up of metal work on front of album, as it peeks through the hole in the clock.


Close up of feathers, metal flowers and gear attached to the clock at bottom right corner.


Another shot of the butterfly wings, vintage metal button, bird, metal flowers and chain holding two old, vintage master keys.


Left side of clock open where album slides in.


Rights side opening where album sits, showing that the coin envelope chains dangle outside the opening to add to the metal look of the Steampunk.

Another view of the front of the clock, showing placement of metal flowers on top, feathers and metal flowers cluster at bottom right, and the album peeking through the square opening in front.

Well, that's it for the clock and album.  I'd love to know what you think.  Please post a comment if you have the time, I'd love to hear from you.

Till next time - Sharon

Monday, December 6, 2010

New prototype projects to be posted soon

I've been working on some new projects (as always), and one of them is a double tri-shutter album.  The dimensions of it (closed) are 6x8 inches, however, it opens up to a 6 x 24, with tons of real estate for pictures, journaling, embellishments and pure fun!!  As I looked at the prototype this morning, my brain started ....... we all know how that goes!  I will now use that basic frame and take it further, reinforcing it for even more sturdiness, adding chipboard, distressing it, will be sewing on the patterned papers and card stock that adorn the inside of this wonderful mini album.  I can imagine it being used for numerous occasions - tons of pictures all in one place, and then folding down to a convenient size for storage and/ or transport.  Even if you leave it semi-open, it makes a wonderful display item as you can see the folding mechanism when you look down on it.  It takes minimal paper and card for its construction, which then leaves you tons of time for embellishing and "tweaking" to your heart's content.

On another note, I've been crocheting covers for the 10,000 plastic tube hangers that everyone has around their house.  Beautiful pattern - no more clothes slipping off the hangers, no more bumps on sweaters that are hung, beautiful addition to every closet, and a wonderful idea for giving for that last minute "hostess gift" when you're invited somewhere.  They will be embellished with bows and/or crochet Irish Roses.  I love working on projects like this - a definite take along project for those of us who just can't stand sitting and doing nothing.  I can see lots of these being given as gifts over the next year or so.

So, that's the Monday morning update on a couple of the things that were done over the weekend.  Pictures will be posted in the near future.  Keep coming back and looking - I think you'll like them.

Have a great week - beautiful and sunny here today - going to 70!!!

Shar

Monday, November 29, 2010

Where do I begin - so much to do, so little time ..............

Well, ever told yourself that phrase?  Where has the time flown this year - as I'm sure you've said, next year will be different.  I promise that 2011 will be more productive - paper crafting and hand made books included.  Right after the first of the year, agendas will be made and kept.  Have you ever said that phrase too?

As you've read in my profile, I married my childhood sweetheart back in July, 2009.  He moved me from Michigan across country to our lovely village in the central coast region of California.  As I'm sure some of you know, combining two people's possessions, into one home, can cause upheaval and frustration, trying to figure out where to move things, what stays, what goes, etc.  That behind us now, it's time for the both of us to follow through with our plans that we've talked about for two years now.  And next year is it ........

I hope to post many, many books that I will be creating for sale in a newly opened, eco friendly children's store, utilizing AF/LF products, and some of them utilizing re-purposed materials to follow the theme for the store.  The area where I work is also rich in antique stores, and gift stores - all up and down the coast.  I will be embarking on prototypes for various styles of books, specialty albums, boxes, and other paper crafts for their stores also.

So it will be a busy year and now that I have the blog set up, I can share with everyone the joy of creating treasures with paper, and I'd love your feedback - either negative or hopefully, positive - if you see something that peaks your interest.

Well, back to the drawing board on creations for the new year.

Thank you for stopping by - make sure and hit the view all in the photo show that's playing - it will show you some of my past creations that I remembered to take pictures of before they went to their new home.

Also, make sure and sign up to follow the blog (on the right side of this page, toward the bottom), and you will be notified when new material is posted.

Thanks again for stopping by, and see you next time.

Sharon

Thursday, November 25, 2010

Happy Thanksgiving everyone !!

Boy, where has this year flown? I have so many mini albums, handmade books, and other papercraft ideas flying around in my head it makes my head spin ...... like a roulette wheel, waiting to land on one special one to undertake. I have several in prototype status, and hopefully will be finished soon. Pictures will follow.


Just wanted to take a moment and thank my husband, Nathan, for being my inspiration for trying new projects, lending support with nothing but encouragement, and giving me that push that I need sometimes to "just do it". I'm also thankful for my sister, my children, my dear friends here in California and back in Michigan, for being supportive in my projects, and in my dreams for the future. Without all of you, my life would be empty.


I have so, so many things to be greatful for in my life, and family, friends, good health, and a million ideas of things to do are just a few. Thank you to all. Off to finish cooking and preparing our feast for today - sure hope everyone is hungry - I cooked enough for an army !!!!

Sunday, November 21, 2010

Ah, finally figured it out !!!

Well, now that I did that, I can now let everyone have access to my photos of past projects that I fortunately took pictures of before letting them go to their new homes. As we have all felt at one point in our lives, I could kick myself for not taking photos of all of them, but at least I have these for now. Having learned that painful lesson, I will be posting photos of the new projects I have been working on lately, in the near future.

I hope you all enjoy looking at the projects, half as much as I enjoyed creating them. Lots of really neat stuff in the works - I'll keep you posted.

Sharon

Thursday, October 28, 2010

Handmade boxes and file boxes

Boy, what fun I had with these.  In making my own handmade albums, I always wanted to place them in a decorative, protective box that matched the album.  Going to the store and buying one for a particular album I had made to give as a gift, left me with the same feelings of frustration as I had with finding the right store-bought album.  Never the right color, the right size, etc.   So, I embarked on a mission - I wondered if I could make my own.  Set forth below are a couple of the boxes that I made for albums.  Even though they need refinement, they turned out pretty cute for my first attempts several years ago, at making boxes from chipboard and paper.


This box is actually a wooden cigar box that has been covered with paper created by photo editing software, taking my own heritage family pictures and printing them on paper to cover the box.  All of the people in this cover paper are my ancestors.  I got the box from a dear friend of mine, Carol Clark, which allowed me to work with this cigar box.  It actually looks like a leather bound book if you were to sit it on a book shelf - the spine that is.


The picture above shows you the leather spine on the cigar box, along with the paper that I generated from my home pictures and photo editing software.  


Above is a bottom shot of the box - painted a soft sea foam green and later I used gold Rub and Buff on the simulated "pages" of the box.


Ah, these were fun - they are all sorts of accordian file boxes - I store everything from pictures, to DVD movies, to CD backups of my files, to business receipts, and even recipes........... the sky is the limit, and they are totally addictive to make - simple too.  I would come home from work every night and make another one.


Here's on of the file boxes - loved this one - love the classic black and white - gender neutral for gift giving.


Another shot of the black and white box.


Here is another file box, but unfortunately the black file dividers do not photograph well - this box was floral in theme and basically black, grey and white.


Another view of the black/grey/white box.


This open to file box was devised for my kitchen, back when I lived in Michigan.  I wanted easy access to its contents so I left the cover off and made twice as many dividers for recipes that I intended to place in it.


Since moving to California, I have since found a different purpose for this same open top file box - I use it for hard copy back up of all of my digital photos - each re-writeable DVD has a family member on it and stored in this box - the extra dividers were needed as I have so many different DVDs from back ups.

Below are several more file boxes that were made during my week of total addiction to these fun boxes.


Now for my favorites and totally indispensable drop spine boxes - wonderfully designed to hold your most precious handmade albums and books.


This is one of my favorites so far - the drop spine box.  I loved the orchid and green papers and the Prima roses fit perfectly with the paper.  This box can be made as large or as small as you like and any depth you need.  Great box for housing your finished albums.


This shot reflects the ribbon closure on the right side of the box.


Here is a view of the inside of the box - notice how the spine drops down and leaves the sides of the box free-standing but still enclosed.


Same box, different papers - next several photos will show this same box and the actual drop spine.


Well, I think that's it for tonight - wow, a walk down memory lane from about 5+ years ago....... I'll just have to make more of these little guys - love them!

Hopefully tomorrow, more pictures.  Maybe it will be the chipboard gatefold album........ hum, yeah that one (still not completed, but y'all understand that dilemna, right?) 

Sharon